
Tilted Grid Tutorial - by Kinsey
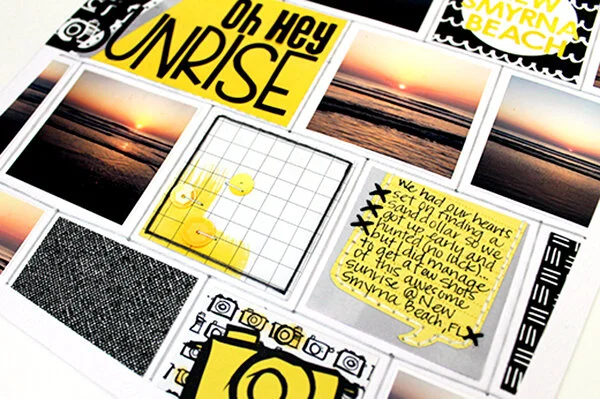
Hey everyone! Kinsey here with and I’ve got a little tutorial on making a “ruler-less” tilted grid for you guys. Before we jump in, I wanted to show you guys my finished layout so you know what I mean by tilted grid…

So to make the grid, you’ll need:• Background paper or cardstock for your lo • Chipboard trimmed to the width that you want the squares of your grid. Mine is 2.5in x 13in. (You can also use a piece of a cereal box or cardboard box for this.) • Pencil

To make the explanation/ demo less complicated, I created step by step diagrams; the first will be the same anytime you’re making a ruler-less grid, and then 2 grid options (2a OR 2b) depending on which look you’re going for, you’ll choose one or the other.
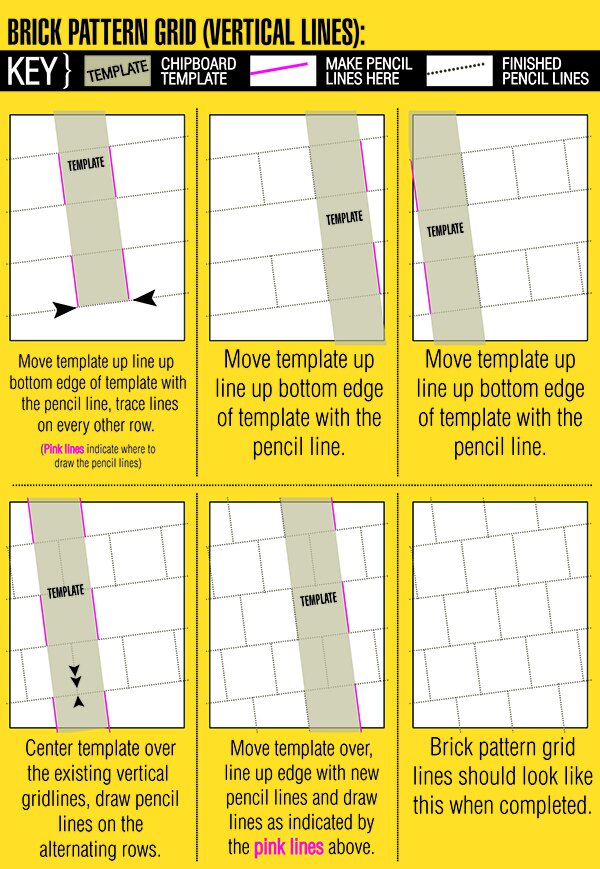
(2a) Straight Grid (Vertical Lines)- the blocks line up horizontally and vertically. (2b) Brick Grid (Vertical Lines)- the blocks are offset like a brick wall pattern.
Once you have your template at the ready, lay it across the middle of your page to start making the horizontal-tilted pencil lines. This doesn’t have to be precise, just eyeball it and follow the steps of the “Horizontal Lines” step by step below:

You should have several rows of horizontal tilted lines going across your page (the # of rows will vary based on the size of your paper and the width of your template/ grid blocks).
If you want to go with a straight grid- see the diagrams directly below titled “STRAIGHT GRID”. If you want a brick style grid, check out the second diagram block titled “BRICK PATTERN”.

Once the gridlines are good to go, I wrangled all of my grid fillers up- photos and papers –and trimmed them down to just a bit smaller than my grid blocks. Since my grid is 2.5in x 2.5in squares, I trimmed my photos and papers to be 2.125in x 2.125in. I started placing the photos onto the grid first since those are most important, and then filled in with the papers. Once I had everything positioned to my liking, I glued it all into place. I decided I wanted to add long stitches where the gridlines were so I pierced at each crosspoint in the grid, erased all the lines, and then added stitching. If you don’t want to stitch/sew, you could outline everything with a pen, thin washi tape, or even ribbon. You could also just erase all the gridlines and let the grid speak for itself.
Last but not least, I added all the fun bits- embellishments, journaling, and some more sewing here and there. Here’s a close up of the finished layout…
So now you guys know a quick and easy way to make your own grid layouts and the best part is that it’s totally customizable. You can alternate or have different widths of gridblocks or even make grids within a grid…so cool!
As always, we’d love to see your creations so be sure to link us up in the comments! Questions? Leave those in the comments as well and I’ll be sure to reply directly there with answers or suggestions. As always, thanks so much for hanging with me today!
xo, Kinsey
Shop for Plus One at your local scrapbook stores and online at Scrapbook.com and Simon Says Stamp!